How To Clean a Hobart Slicer
Step by Step Process From SIGMA Equipment on Cleaning a Hobart Slicer

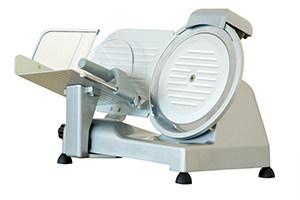
Uniformity and precision are both important qualities in the food industry, especially when it comes to slicers. A Hobart slicer is a food preparation tool that helps you achieve high-quality cuts. Whether you need to cut vegetables, deli meat, cheese, or charcuterie, Hobart slicers deliver precision with every slice. Not only do slicers enhance the final presentation of the product, but they also help produce higher quantities, which ultimately generates more sales.
In addition to creating precision cuts, a slicer’s versatile features are a big part of why they are depended upon by so many different operations. Hobart offers slicing options for both heavy-duty and medium-duty applications. They are utilized in delis, restaurants, retail establishments, and more.
Since slicers are so commonly used and are a vital part of daily operations, it is pertinent that they are cleaned correctly. So, how do you properly clean a Hobart slicer? The following information is a step-by-step process on how to safely clean your Hobart slicer and maintain it so that you can keep your equipment safe and ensure that you will have uniformly cut products for years to come.
In this article, we’re going to discuss:
- Things to Know Before You Begin Cleaning a Hobart Slicer
- How To Clean a Hobart Slicer
Things to Know Before You Begin Cleaning
Before you jump into cleaning your slicer right away, there are first a few things you should know about how often cleaning is needed, what safety precautions you should take, and which materials are safe to use.
*This is not an exhaustive list, we always recommend thoroughly reading your unit’s manual before beginning any type of work.
Frequency
Hobart recommends that you clean the slicer thoroughly after each day’s operation, or if it’s stagnant, clean regularly to maintain its condition. Also keep in mind that you need to abide by national, state, and/or local regulations.
Safety Measures
Be sure to always unplug the machine before you begin cleaning. You should also use extreme care when working near the knife blades and for an extra measure of safety, it is recommended that you wear cut resistant gloves when cleaning.
Cleaning Materials
A solution made of mild stainless steel or aluminum safe detergent mixed with hot water (86 ℉ or higher) can be used on all surfaces of the slicer. The detergent should not exceed 200 parts per million concentration of available chlorine, anything higher will cause the metal to corrode. i.e. 1 tablespoon of 5.25% sodium hypochlorite bleach + 1 gallon of water = 200 parts per million of available chlorine. You should also check that the sanitizer concentration you’re using complies with section 4-510.114 of the FDA Food Code addressing temperature, pH, and concentration. If you’re using a chemical sanitizer other than chlorine, it must be in accordance with the instructions on its EPA-registered label.
How to Clean a Hobart Slicer
Now that you've got the foundational information down, let's get into the nitty-gritty of cleaning a Hobart slicer:
| 1. Unplug slicer and close gauge plate |
| 2. Wash surface with a cloth soaked in warm water |
| 3. Clean removable parts of slicer |
| 4. Clean the separate parts of the slicer |
| 5. Clean underneath the slicer |
1. Unplug slicer and close gauge plate
First up, we’re mentioning the safety measures again because they’re just that important! Start by unplugging the slicer’s power chord and putting on some protective gloves. You will then turn the index knob completely clockwise to ensure the gauge plate is closed. This keeps you safe from any accidents while cleaning the equipment.
2. Wash surface with a cloth soaked in warm water
Next, you will soak a cloth in warm water and mild detergent and wash the surfaces of the slicer gently. Once you have cleaned all of the surfaces, rinse them off with water.
3. Clean removable parts of slicer
Once the slicer is rinsed off, you should clean the ring circle and any other removable components of the machine. Some common pieces to clean are knives, product trays, and any part that comes in contact with the food product. This step may vary depending on which model of slicer you own. If you are unsure, reference the owner’s manual, or contact Hobart on what the best steps to take are.
4. Clean the separate parts of the slicer
Now you will clean the separate parts of the machine using a mild detergent or non-abrasive dish soap. It’s important to use non-abrasive soap to keep the blade sharp and help prevent damage to your machine.
5. Clean underneath the slicer
Using a damp cloth, warm water, and mild detergent, clean underneath the machine. Once done, you should dry the area with a different cloth before setting the slicer back onto the surface. If the equipment is not completely dry, it can cause bacterial growth.
As always, it’s a good idea to do a deeper dive into what kind of care your specific Hobart slicer model will need due to different slicers’ requirements. It’s also important to know which model you have and follow the machine’s specific cleaning process.
Summary
Cleaning your Hobart slicer regularly is extremely important to the quality of both your machine and product. You should thoroughly clean your slicer after each day's operation by using safety gloves, a soft cloth, mild detergent, and hot water. Be careful to clean all parts of the slicer that come in contact with the product including its surface, any removable or separate parts, and underneath. Once done cleaning, you should rinse with warm water and make sure all the pieces are dried completely to avoid bacterial growth.
If you are interested in learning more about how a slicer can help your production or you are interested in buying a quality preowned Hobart slicer, one of our equipment experts can help answer your questions.